Test Your Skills 3
Test Your Skills
Want to sharpen your design skills? Try taking our quiz to see if you can spot common mistakes often seen in scrapbook galleries! Use the Design No-no’s PDF checklist to help in your search.
Knowing the No-No’s Challenge
Welcome to Challenge 3!
One of our goals as Design Beautiful Pages instructors is for you to become so familiar with the No-No’s that you can almost recite them by heart, and that you recognize them on pages by yourself and others.
In the downloadable PDF the No-No’s are divided into sections. In this lesson I’ve targeted one section, though I’ve added a few other categories as well.
By looking at this page, can you tell which section is the primary target?

List as many No-no’s as you can. When you think you have them all, click the button to see the answers.
LIST OF NO-NO’S
All the No-No’s in the following category can be found on this page:
Photos
- Photos are too dark
- Horizon line is crooked
- Photos are too saturated
- Photos don’t match in color
- Photos don’t fill a mask
- Photos that would look better cropped
- Lacking photo definition on overlapping or clustered photos
This page also has the following No-No’s:
Cluster/Elements/Anchors
- Missing drop shadows on items that need a shadow
- Shadows that aren’t the right size for where they’re placed
- Shadowed elements below graphic elements
- Elements that aren’t proportional with the rest of the page
Type
- Placing the title randomly (place it in proximity with another focal point)

TAKE A CLOSER LOOK
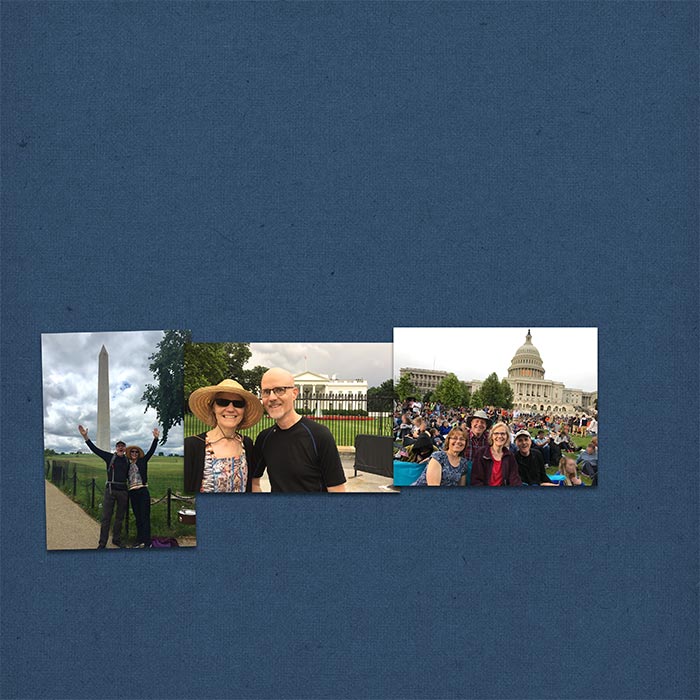
Let’s drill down a bit and view each section of this page as it’s being built. We’ll start with the photos on a textured background.
Photo Quality
The photos on this page need help. They’re all a little dark, and the one on the left is quite dark. The middle photo is too saturated and too yellow, and the third photo has a crooked horizon as well as an overly warm color cast. (I’ve purposefully blurred some of the faces in the background on the third image.) This photo might also benefit from some cropping.
Drop Shadows
The photos overlap, yet they all have the same high drop shadow. Unfortunately, that’s an immediate tipoff that the designer of this page is a beginner.
Photo Definition
The three photos could also stand to be more distinct from one another, which almost always means some kind of white stroke outline.

SEE MY CORRECTIONS
Here are the corrections I made:
All three photos have been lightened appropriately and match each other in color. (To correct photos I use the actions from my Fix Photos FAST class.)
I also straightened and cropped the 3rd photo. You can still see lots of people in the background, which is good because it shows how it looked at the outdoor concert we attended with our friends, but the focus is now more on the Capitol Building and the four of us.
To make the photos stand out from each other better, I added a white inner stroke outline.
And finally, I made each drop shadow different, starting with a low drop shadow for the photo on the left (the bottom photo in the overlapping stack), then a little higher for the middle photo, and then popped up the shadow a bit more for the final photo.
It’s OK to use a larger drop shadow like the one on the right, but only on photos that you intentionally want to pop up. Make sure that the papers, photos, or elements below the popped up photo have a logical progression of drop shadow sizes.

EXAMINE THE MASK
Here’s a closer look at the mask with a photo clipped to it.
Notice that the straight edges of the photo show on the left and right sides meaning the photo either needs to be enlarged or the mask made smaller so no straight photo edges are visible.
Also, at the bottom there’s a black area. This is actually part of the photo, but it doesn’t look good. The color should be changed if it shows below the row of photos.

SEE THE FIXED MASK
Here’s my fixed mask:
I’ve changed the color of the photo along a couple of the edges so no dark area is visible. Viewed like this it doesn’t look so great, but I was taking into account the end result when most of it would be hidden by the photos.

I placed the photo high so I could turn the flags into out-of-bounds elements. I don’t create an out-of-bounds effect very often, but it’s fun when it works out!

Here’s what the mask looks like with the photos. There’s one spot on the mask (lower right) where you can see the flag pole near the bottom and the mask edge doesn’t look the same as the rest of the mask, but I’ll be putting an element over that soon.

SEE THE NEXT STEP
Here’s the original page with a title added:
The title on this page describes the events well but it has several problems:
- It’s rather long for a title. I would break it up into more than one line or use a shorter title.
- It doesn’t follow the rule of Proximity. It’s just floating out there on its own. It would look better close to another focal point such as the photos or the edge of the page.
- The position of the title produces trapped space between the title and the photos.
- It uses an outdated font (Apple Chancery). There are so many great fonts to choose from, so why choose a font that’s associated with amateurs? (Pardon me for being blunt, but I’m committed to telling you the straight truth.) If you like using fonts like these, please feel free to do so, but understand that it will color the opinion of people who view your page. (I know. People shouldn’t judge. But they do.)
You might be able to use this font judiciously, perhaps in some word art, but most people who use this font don’t go beyond what you see here. It’s not horrible…but it’s not great.
Here’s what’s good about it: It tells us what’s happening on the page. Yay! And it’s white, which contrasts well with the background paper. In other words, some type is better than no type!

VIEW REVISED TITLE
Here’s what I did instead:
- I made the title short and big, and I added a 3D effect because this is such a big, bold location. (I show the 3D type effect in my class Custom Shadow Mastery, Part 2.)
- I snuggled the title up to the photos for proximity.
- I added pertinent information with a block of journaling, which also contributes to the overall page design. Sweet!

VIEW FINISHING TOUCHES
Here’s the finished original page we started with:
I’ve added three elements, but two have problems:
- The bow is not proportional to the rest of the page. It’s WAY too small, and it has no drop shadow.
- The two star bursts are 2D but are placed over a 3D element. (That doesn’t happen in “real life.”)
- The stroke outline is great. Whew. One out of 3!

CORRECT FINISHING TOUCHES
Here’s my final page with elements:
- The bow is proportional to the rest of the page and has a nice full drop shadow, which bows tend to have.
- 2D elements are placed under 3D elements.
- Following the Rule of Odds I have three red stars and 3 flags.

I hope you had fun recognizing the No-No’s and that you’re getting better and better at finding them!
Credits

Photos by Linda Sattgast and 3 helpful strangers
Page by Linda Sattgast
Mask: Several Design Beautiful Pages masks combined
Paper from Cardstock Nautica by Susie Roberts
Elements: In Pursuit Of Liberty by Michelle Coleman and We Celebrate by Julie Mead
Fonts: Impact (title) and Myriad Pro
Brought to you by Linda Sattgast
