Test Your Skills 4
Test Your Skills
Blending Mindset
The more you play around with blending, the more you can develop what I like to call a “Blending Mindset.” By that I mean that blending often comes to mind as a solution for a problem or as a means of adding an artistic feel to your page.
It’s not something that can exactly be taught—it mostly comes with experience—but I’d like to share my process with you to show you the possibilities.
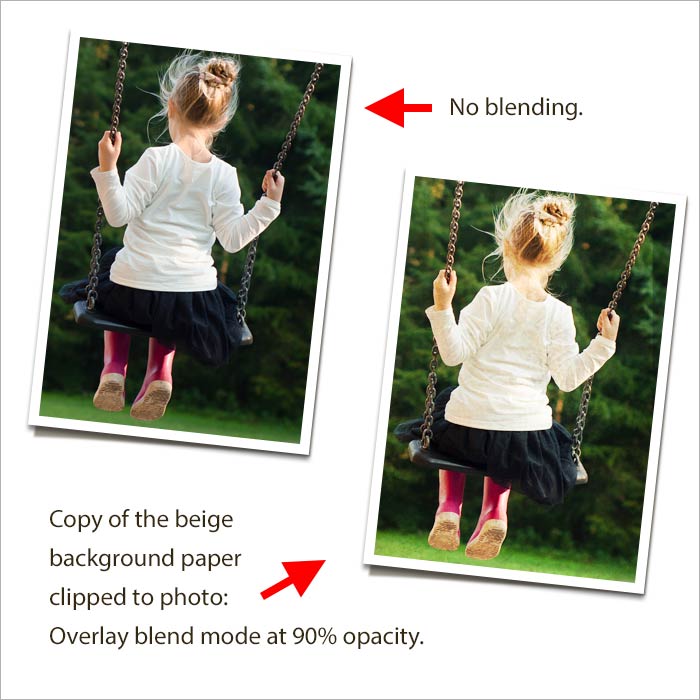
To keep it simple I’ll use two photos to create a blended page. I’ve already placed them in my document and added a stroke outline and custom drop shadow to the photo of the girl swinging.
Question
How can you blend the background photo of trees onto the page without using a blend mode?
SHOW THE ANSWER
Answer
You can use a clipping mask or a layer mask. In this case I used a white to black gradient on a layer mask to make the lower third of the photo taper off and disappear.
Now let’s choose a background paper. My kit papers are mostly shades of cream and brown, which are neutral colors that will go well with my images.
Be careful about using background colors that aren’t neutral on a blended page. Color can hog the focus or detract from your image(s). If you do use a color, in general you’ll want to keep it more desaturated.
Question
Which of these two papers would look best behind my image? Is there a third alternative?
SEE MY PICK
I felt that the darker paper would make my image too dark, since a lot of the trees and leaves are backlit and thus dark, so I chose the lighter paper.
But then I added the dark paper above the light background paper and masked in just a bit of the darker paper around the lower edges and corners.
LET’S ADD ELEMENTS
Here’s my page after adding the elements. By placing a cluster of elements in the lower left I created a diagonal flow through the rays of light coming through the trees and up to the photo.
Notice that I applied the principle of repetition by using elements that repeated the color of the little girl’s cute red boots. I also repeated the shades of cream and brown. The splatter image would be counted as a blended image since it’s a 2D element.
Question
Is there somewhere else I could use blending? (Hint: I used blending 5 more times.)
SEE THE FINISHED PAGE
Here’s my finished page. Compare the prior image with this one and see if you can locate the five places where I utilized blending.
SHOW THE ANSWER
Here are the five places where I added blending.
Click on the images to see for a larger version and to read my assessments.
MY CONCLUSIONS
To Review
Here’s my page without any blending other than a layer mask gradient on the background image.
Here’s my page after applying quite a bit of blending.
Credits
Swing In The Park
Page by Linda Sattgast
Kit: Embrace by Laitha Designs
Font: Myriad Pro
WRAP UP
Some of the blending I used on this page was known territory for me, gleaned from past experience. After awhile you’ll know what kinds of textures and colors will probably work to create a nice effect using the few go-to blend modes, as I taught in one of my instructional videos.
But having a “Blending Mindset” means you’ll often think of blending as a possible solution to something you want to change. You won’t know if it’ll work out, but you take a few seconds to toggle through the blend modes anyway.
And, lo and behold, sometimes that does the trick with very little effort on your part. And sometimes you even get a super cool effect! A lot of the blending I did on this page was the second kind of blending—simply experimenting.
But first you must learn to think of blending as a possible solution or you’ll never even try it.
I challenge you to develop a Blending Mindset!
Brought to you by Linda Sattgast